cryptohack
These CTF write-ups contain spoilers
Written: 2021/10/25
Cryptohack is a great platform to practice and complete cryptographic challenges. The challenges vary covering various types of cryptography, including mathematics, RSA, Diffie-Hellman and Elliptiv Curves for example. The challenges I was able to complete primarily focused on some form of scripting and they definitely vary in difficulty. Since I last worked on challenges here, the number of challenges signficantly grew as well.
As per the Cryptohack FAQ, I will only be posting solutions for those challenges which are woth 10pts or less.
Introduction
Welcome to CryptoHack! These introductory challenges are designed to walk you through the process of solving challenges and submitting flags. Complete the challenges to earn your first gold trophy.
Finding Flags
Challenge notes
Each challenge is designed to help introduce you to a new piece of cryptography. Solving a challenge will require you to find a “flag”. These flags will usually be in the format crypto{y0ur_f1rst_fl4g}. The flag format helps you verify that you found the correct solution. Try submitting this into the form below to solve your first challenge.
This challenge is more to get used to the challenge format and flag format. and the flag is essentially given for us to input.
Flag
crypto{y0ur_f1rst_fl4g}Great Snakes
Challenge notes
Modern cryptography involves code, and code involves coding. CryptoHack provides a good opportunity to sharpen your skills. Of all modern programming languages, Python 3 stands out as ideal for quickly writing cryptographic scripts and attacks. For more information about why we think Python is so great for this, please see the FAQ. Run the attached Python script and it will output your flag. great_snakes.py
This one is again another straight forward challenge. We are asked to download the great_snakes.py file and run it to get our flag. The source code is below:
#!/usr/bin/env python3

import sys
# import this

if sys.version_info.major == 2:
    print("You are running Python 2, which is no longer supported. Please update to Python 3.")

ords = [81, 64, 75, 66, 70, 93, 73, 72, 1, 92, 109, 2, 84, 109, 66, 75, 70, 90, 2, 92, 79]

print("Here is your flag:")
print("".join(chr(o ^ 0x32) for o in ords))
The above code uses chr() to return a string representation of Unicode values in integer format. The ords list gives us a number of integers, which chr() then multiplies with the HEX number 0x32, which in decimal is 50:
>>> chr(81)
'Q'
>>> chr(81 ^ 0x32)
'c'
>>> chr(81 ^ 50)
'c'
Looping through the list gives us the flag and the script prints it at the end.
Flag
python great_snakes_35381fca29d68d8f3f25c9fa0a9026fb.py
Here is your flag:
crypto{z3n_0f_pyth0n}
Network Attacks
Challenge notes
Several of the challenges are dynamic and require you to talk to our challenge servers over the network. This allows you to perform man-in-the-middle attacks on people trying to communicate, or directly attack a vulnerable service. To keep things consistent, our interactive servers always send and receive JSON objects.
Python makes such network communication easy with the telnetlib module. Conveniently, it’s part of Python’s standard library, so let’s use it for now.
For this challenge, connect to socket.cryptohack.org on port 11112. Send a JSON object with the key buy and value flag.
The example script below contains the beginnings of a solution for you to modify, and you can reuse it for later challenges.
Connect at nc socket.cryptohack.org 11112
This is the last of the Introduction challenges and gives us a sample of those challenges which will use a telnet connection to a Cryptohack server and interact with that server to obtain the flag. We are told to get the flag, we need to pass a JSON key and value pair.
#!/usr/bin/env python3

import telnetlib
import json

HOST = "socket.cryptohack.org"
PORT = 11112

tn = telnetlib.Telnet(HOST, PORT)


def readline():
    return tn.read_until(b"\n")

def json_recv():
    line = readline()
    return json.loads(line.decode())

def json_send(hsh):
    request = json.dumps(hsh).encode()
    tn.write(request)


print(readline())
print(readline())
print(readline())
print(readline())


request = {
    "buy": "clothes"
}
json_send(request)

response = json_recv()

print(response)
Adjusting the reqest variable for the provided value pair will give us the flag when running the script. To note, I made some minor changes to the script provided above, such as creating a for loop to iterate over the messages from the server and decoded the responses and stripping new line characters.
Flag
#!/usr/bin/env python3

import telnetlib
import json

HOST = "socket.cryptohack.org"
PORT = 11112

tn = telnetlib.Telnet(HOST, PORT)

def readline():
    return tn.read_until(b"\n")

def json_recv():
    line = readline()
    return json.loads(line.decode())

def json_send(hsh):
    request = json.dumps(hsh).encode()
    tn.write(request)

for i in range(4):
    print(readline().decode("utf-8").rstrip())

request = {
    "buy": "flag"
}
json_send(request)

response = json_recv()

print(response)python telnetlib_example_dbc6ff5dc4dcfac568d7978a801d3ead.py
Welcome to netcat's flag shop!
What would you like to buy?
I only speak JSON, I hope that's ok.
{'flag': 'crypto{sh1pp1ng_f0r_fl4g5}'}CRYPTO ON THE WEB
Billions of people use cryptography on a daily basis without realising it. The 2010s saw the widespread adoption of encryption on the web, accelerated by the Snowden disclosures: in 2015, 30% of pages loaded on Android were protected by Transport Layer Security (TLS), but by 2020, it was 90%. Alongside TLS, major websites employ hash functions for password storage, signed tokens for authorisation, and complex protocols for handling payment-card data.
However, as we’ve seen from other categories, cryptography is full of subtleties, and teams building web apps often get it wrong. This highly practical category explores common ways that cryptography is used in web apps, together with devastating implementation errors that are seen in the real world.
Token Appreciation
Challenge notes
JavaScript Object Signing and Encryption (JOSE) is a framework specifying ways to securely transmit information on the internet. It’s most well-known for JSON Web Tokens (JWTs), which are used to authorise yourself on a website or application. JWTs typically do this by storing your “login session” in your browser after you have authenticated yourself by entering your username and password. In other words, the website gives you a JWT that contains your user ID, and can be presented to the site to prove who you are without logging in again. JWTs look like this:
eyJ0eXAiOiJKV1QiLCJhbGciOiJIUzI1NiJ9.eyJmbGFnIjoiY3J5cHRve2p3dF9jb250ZW50c19jYW5fYmVfZWFzaWx5X3ZpZXdlZH0iLCJ1c2VyIjoiQ3J5cHRvIE1jSGFjayIsImV4cCI6MjAwNTAzMzQ5M30.shKSmZfgGVvd2OSB2CGezzJ3N6WAULo3w9zCl_T47KQ
You can recognise it because it’s base64-encoded data split into three parts (separated by a .): the header, the payload, and the signature. In fact, it’s a variant of base64 encoding, where the + and / have been replaced by different special characters since they can cause issues in URLs.
Some developers believe that the JWT encoding is like encryption, so they put sensitive data inside the tokens. To prove them wrong, decode the JWT above to find the flag. There are online tools to do this quickly, but working with Python’s PyJWT library will prepare you best for future challenges.
As the challenge introduction indicates, these challenges will be focusing on web based cryptography. This first challenge introduces us to JSON Web Tokens (JWT), which is a Base64 encoded string that holds different elements such as a header, the payload and a signature.
There are a multitude of ways in which we can decode the above string. This challenge is relatively easy, to get the flag we just need to decode the message.
Flag
echo -n "eyJ0eXAiOiJKV1QiLCJhbGciOiJIUzI1NiJ9.eyJmbGFnIjoiY3J5cHRve2p3dF9jb250ZW50c19jYW5fYmVfZWFzaWx5X3ZpZXdlZH0iLCJ1c2VyIjoiQ3J5cHRvIE1jSGFjayIsImV4cCI6MjAwNTAzMzQ5M30.shKSmZfgGVvd2OSB2CGezzJ3N6WAULo3w9zCl_T47KQ" | tr '.' ' ' | tr '_' '/' | base64 -d
{"typ":"JWT","alg":"HS256"}{"flag":"crypto{jwt_contents_can_be_easily_viewed}","user":"Crypto McHack","exp":2005033493},eVv9 g̝`.0>;>>> import jwt
>>> token = "eyJ0eXAiOiJKV1QiLCJhbGciOiJIUzI1NiJ9.eyJmbGFnIjoiY3J5cHRve2p3dF9jb250ZW50c19jYW5fYmVfZWFzaWx5X3ZpZXdlZH0iLCJ1c2VyIjoiQ3J5cHRvIE1jSGFjayIsImV4cCI6MjAwNTAzMzQ5M30.shKSmZfgGVvd2OSB2CGezzJ3N6WAULo3w9zCl_T47KQ"
>>> print(jwt.decode(token, options={"verify_signature": False}))
{'flag': 'crypto{jwt_contents_can_be_easily_viewed}', 'user': 'Crypto McHack', 'exp': 2005033493}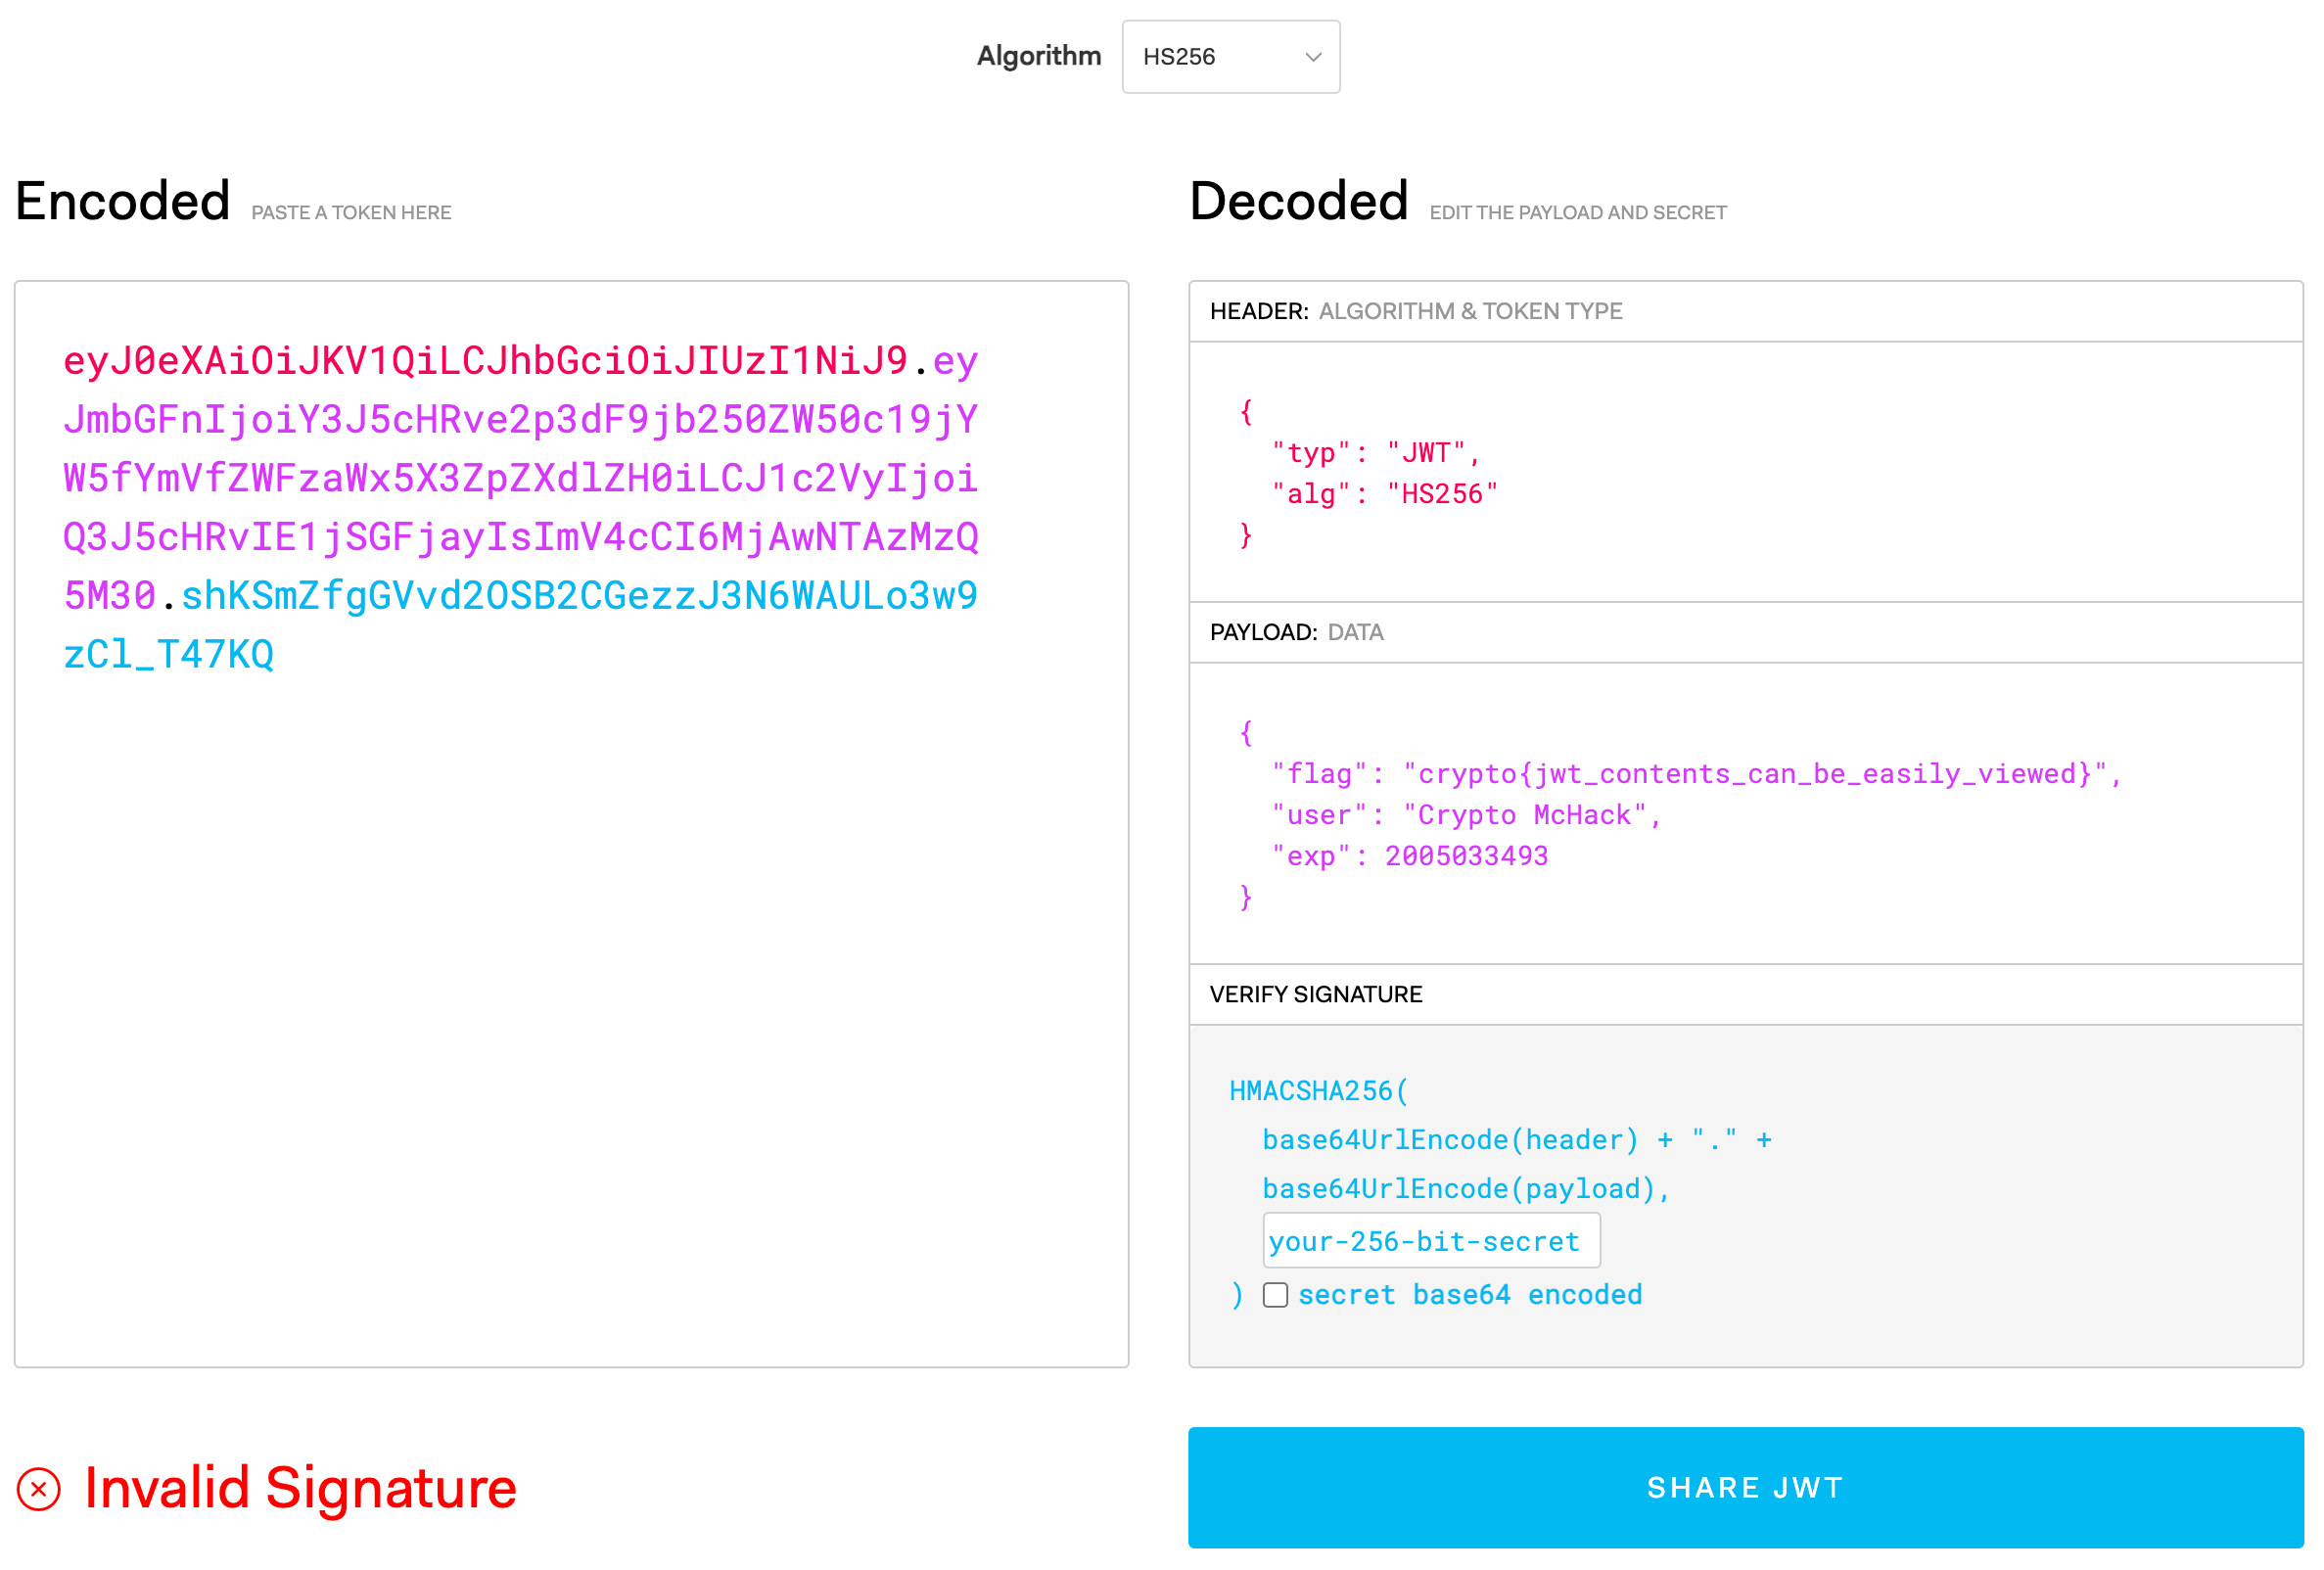
JWT Sessions
Challenge notes
The traditional way to store sessions is with session ID cookies. After you login to a website, a session object is created for you on the backend (the server), and your browser (the client) is given a cookie which identifies that object. As you make requests to the site, your browser automatically sends the session ID cookie to the backend server, which uses that ID to find your session in its own memory and thus authorise you to perform actions.
JWTs work differently. After you login, the server sends your web browser the whole session object in a JWT, containing a payload of key-value pairs describing your username, privileges, and other info. Also included is a signature created using the server’s secret key, designed to prevent you from tampering with the payload. Your web browser saves the token into local storage.
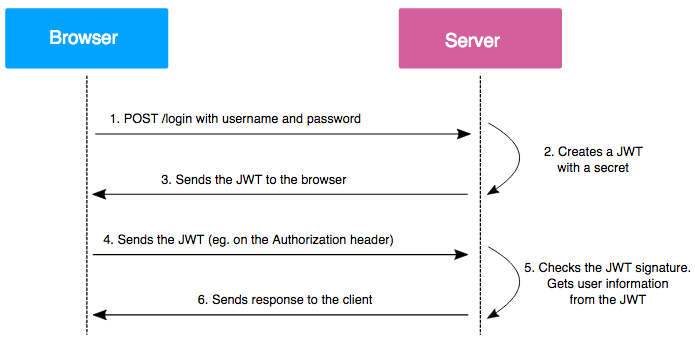
On subsequent requests, your browser sends the token to the backend server. The server verifies the signature first, and then reads the token payload to authorise you.
To summarise, with session ID cookies, sessions live on the server, but with JWTs, sessions live on the client.
The main advantage of JWTs over session ID cookies is that they are easy to scale. Organisations need a way to share sessions across multiple backend servers. When a client switches from using one server or resource to another, that client’s session should still work. Furthermore, for large orgs there could be millions of sessions. Since JWTs live on the client, they solve these problems: any backend server can authorise a user just by checking the signature on the token and reading the data inside.
Unfortunately there are some downsides to JWTs, as they are often configured in an insecure way, and clients are free to modify them and see if the server will still verify them. We’ll look at these exploits in the next challenges. For now, the flag is the name of the HTTP header used by the browser to send JWTs to the server.
We are provided with an overview of how JWT works and is implemented. The challenge is asking us, which HTTP header is used to JWTs to the server, which can be found in the image above.
Flag
Authorization